Hardware Upgrade Forum

Hardware Upgrade Forum (https://www.hwupgrade.it/forum/index.php)
-   Overclocking estremo (https://www.hwupgrade.it/forum/forumdisplay.php?f=131)
-   -   [GUIDA] Coibentazione della scheda madre per bench ln2/dry ice (https://www.hwupgrade.it/forum/showthread.php?t=1394477)


rera 30-01-2007 13:25

[GUIDA] Coibentazione della scheda madre per bench ln2/dry ice
 
Guida alla preparazione della scheda madre per i bench ln2 o ghiaccio secco presa da xtremesystems. Ringrazio k|ngp|n per avermi permesso di riportarla.

[quote=k|ngp|n]
Quote:

Originariamente inviato da k|ngp|n
Here is another guide on how I prepare and insulate my motherboards when installing a ln2/di unit. Obviously there are many ways this can be done, some more involved than others. It doesn't have to be overdone, messy, or complicated. Some key things to remember are to isolate and seal off the socket area from outside air both on the top and bottom of the motherboard. Here is how I do it...clean and easy and I can't remeber the last time I have had a mobo die on me due to socket condensation, so most importantly THIS WORKS!

To start you will need these materials:
Pipe wrap insulation with the foil (lowes or home depot), round tube installation 1/2 inch 3/4 inch, scissors and a sharp blade, clear nail polish, "shop rags" or other heavy duty paper towel, and some thermal interface material (I like ceramique the best)


Now take your motherboard and apply the clear nail polish to all surface mount components all around the socket area, both top and bottom of the mobo. I marked off the bottom pic to give a good idea of the size of the area that needs to be considered for this. I will be using a 590sli lga775 board for this example:


While your waiting for the polish to dry, take your foil pipe wrap and cut out 2 gasket pads which will be used to seal off air from coming into the socket between surface mount componenets around the socket. You will make 2 indentical gaskets and stick them on top of each other, then stick them down and use a small thin tool to push the double gasket down in between the caps, inductors, and socket like in the second pic here:


Do the same for the bottom of the mobo making 2 pieces and sticking them together, then sticking them on the backside of the mobo:


Now depending on what cpu unit you are using the next few steps may vary slightly, but will still be just about the same procedure for mounting most units. Take your backplate and install the support rods for the container as well as the insulating piece of rubber that will seal off the backside socket area and prevent the aluminum plate from shorting out the mobo:


Now slide it through the mobo from the bottom and flip the mobo over to finish the installation:


Now we will make 2 more socket gaskets out of the shop rags that will catch and absorb any drips or moisture that might occur around the cpu if there is air getting through somewhere that you can't see. Stack them and slide them down the rods. These shop towels or any other heavy duty paper towel should be on every benchers shelf. They are excellent at wicking away moisture when it arises. I use them every time I bench in various ways:


rera 30-01-2007 13:27

Quote:

Originariamente inviato da k|ngp|n

Now we will make the main foam gasket that will surround the socket. Use the 1/2 sheet foam insulation for this step and center the hole for the unit right over the socket and just make sure the hole doesn't exceed the diameter of you cpu unit as we want to minimize any air space:


Time to install your cpu unit finally. Cover the speader of the chip with your tim of choice, and set your cpu container down on the center of the chip:


Now take your round pipe insulation that hopefully matches the outer diameter of your unit, and cut the lower piece that will go under the cpu holddown bracket. Make it oversized vertically, so when you slide the holdown bracket on top, it squeezes it down and compesses the foam down on the mobo as to seal off the socket area fom airflow:


Now slide down your hold down bracket and install the mounting hardware accordingly. In this case put down your shoulder spacers, then springs, top shoulder spacers, and finally thumbnuts:


Almost ready to bench now :D. Crank down the bracket nice and tight, add your top piece of insulation and your ready to go:


As a final step I will take some paper towel and fold it for a wrap that goes around the lower insulation under the hold down. It willl "catch" any run-off or condensation that forms on the hold down or outer insulation and prevent it from ever reaching the mobo:


Happy benching :toast:

Ho riportato il thread in inglese, appena ho un pò di tempo cerco di tradurre, per ora spero sia utile anche così.

wiltord 30-01-2007 13:33

hai scelto uno qualunque insomma per chiedere una mano.. :sofico:

rera 30-01-2007 13:42

Quote:

Originariamente inviato da wiltord
hai scelto uno qualunque insomma per chiedere una mano.. :sofico:

Già, un principiante :sofico: :D

HYPERR 30-01-2007 14:17

Quote:

Originariamente inviato da rera
Già, un principiante :sofico: :D

:D su hwbot si è preso il secondo posto subito dopo Opb...
Comunque, iscritto... :p

gianlu71 30-01-2007 15:06

Quote:

Originariamente inviato da HYPERR
:D su hwbot si è preso il secondo posto subito dopo Opb...
Comunque, iscritto... :p

sarà pure secondo ma tra i due c'è un abisso..... kp è un mito... opb...beh meglio lasciar perdere ;)

@rera: come guida per coibentare c'era anche quella di barbonet che mi sembrava fatta piuttosto bene. comunque complimenti per questa (d.o.c. :) ) e per la sezione in generale che mi piace un bel pò :D

Io_N-Bello 30-01-2007 22:51

Io cmq nn amo usare la carta, se posso evito e nn mi piace nemmeno la flangia a metà tolotto, semplifica il montaggio ma fà colare acqua a volontà.
Con il mio socio ci siamo consultati ed abbiamo optato per questa soluzione dopo aver verificato
il buon contatto sulla cpu


poi per carità ognuno lo fà come vuole :)
come lo strato di carta tra uno strato di neoprene e l'altro,
se si usa il neoprene nn adesivo nn ce n'è bisogno.

Ludus 30-01-2007 23:09

io personalmente uso anche io la staffa a metà, ma precisamente subito dopo la base. poi usando l'armanflex che è molto più morbido del neoprene lo shiaccio e non passa un filo d'aria. per il tubo del tolotto uso due strati di armanflex cilindrici un pò stretti che non fanno passare un filo d'aria, infatti il tolotto è belo asciutto a fine bechata.

Io_N-Bello 30-01-2007 23:22

Sai cosa conta alla fine?
....il risultato! :)

Ludus 30-01-2007 23:42

Quote:

Originariamente inviato da Io_N-Bello
Sai cosa conta alla fine?
....il risultato! :)

esatto :D

bel tolotto comunque hai ;)

rera 31-01-2007 07:47

Ho preso questa guida perchè giravo su xtremesystems e mi è venuta all'occhio subito :)

Se volete integrarla fotografando i vostri metodi di coibentazione prima dei bench fatelo pure, è sempre utile ;)

Don_Lottariote_III 31-01-2007 14:13

Quote:

Originariamente inviato da Io_N-Bello
Io cmq nn amo usare la carta, se posso evito e nn mi piace nemmeno la flangia a metà tolotto, semplifica il montaggio ma fà colare acqua a volontà.
Con il mio socio ci siamo consultati ed abbiamo optato per questa soluzione dopo aver verificato
il buon contatto sulla cpu

poi per carità ognuno lo fà come vuole :)
come lo strato di carta tra uno strato di neoprene e l'altro,
se si usa il neoprene nn adesivo nn ce n'è bisogno.

OT

come salgono le supertalent?
chip?

FINE OT

rug22 31-01-2007 21:43

Personalmente preferisco pure io la sbarra filettata che arriva fin sopra il cannone...

Beh,prima o poi posto le foto di un tolotto particolare:D

rdv_90 02-02-2007 19:43

Quote:

Originariamente inviato da rug22
Beh,prima o poi posto le foto di un tolotto particolare:D

quello per slot 1? :D

comunque se volete qua ci sono un po' di foto http://www.hwupgrade.it/forum/showthread.php?t=1313580

rug22 02-02-2007 20:17

Quote:

Originariamente inviato da rdv_90
quello per slot 1? :D

comunque se volete qua ci sono un po' di foto http://www.hwupgrade.it/forum/showthread.php?t=1313580

No,se dico che è particolare è particolare...

rdv_90 02-02-2007 20:18

Quote:

Originariamente inviato da rug22
No,se dico che è particolare è particolare...

ah :mc:

dai posta :D

Gian92 08-10-2008 15:46

Salve, visto che mi è interessata questa guida mi sono preso la briga di tradurla. Vorrei chiedere ai mod il permesso di postarla (premetto che è versione beta, e quindi va corretta e ottimizzata).

carpo93 08-10-2008 16:20

posta posta
mi sa che ti ringrazierà tutta la parte del forum che non conosce l'inglese:D

Gian92 08-10-2008 19:16

Comunque, potreste dirmi esattamente dove posso trovare tutti i materiali (magari anche darmi indicazioni su dove posso comprare un cold plate per la peltier)? Ve ne sarei molto grato.

Gian92 09-10-2008 11:27

Guida alla coibentazione della scheda madre per bench ln2/dry ice
 
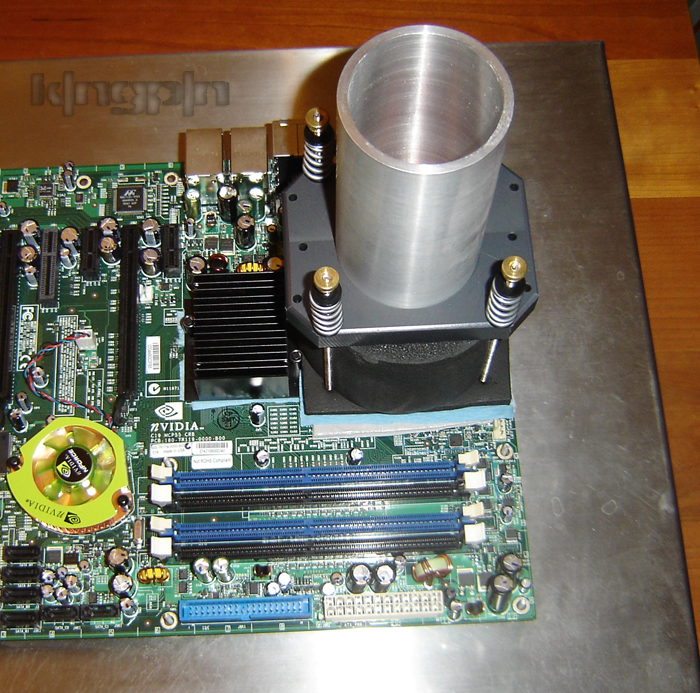
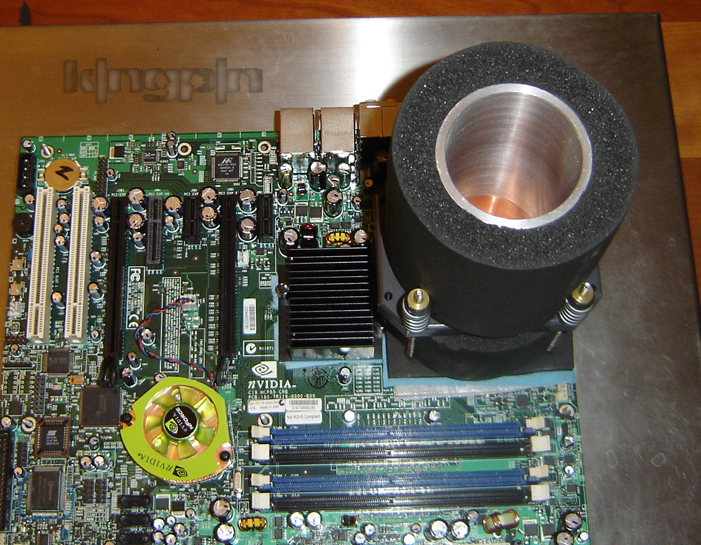
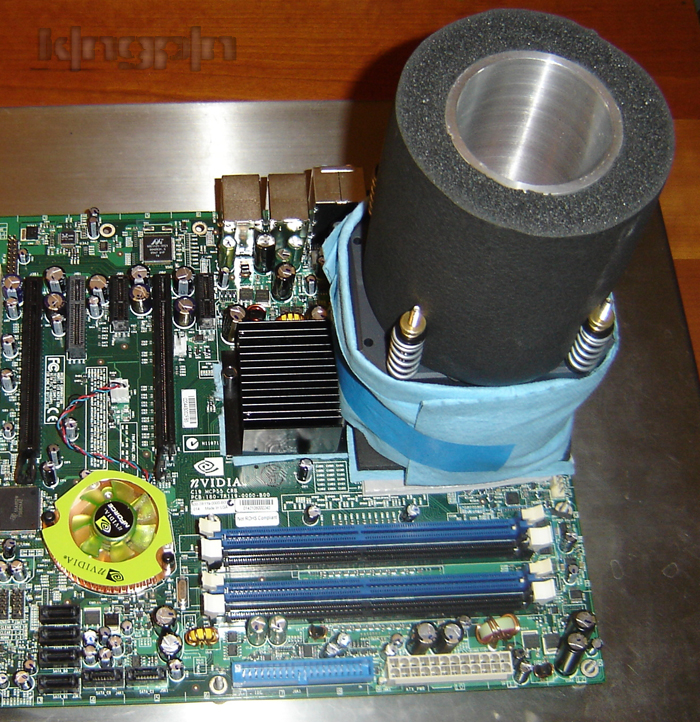
Ecco qua un'altra guida su come preparo e coibento le mie schede madri quando installo un'unità ln2/di. Ovviamente ci sono molti modi per farlo, alcuni più elaborati di altri. Non dev'essere esagerato, disordinato o complicato. Alcune cose chiave da ricordare sono di isolare e sigillare l'area del socket dall'aria esterna sia il sopra che il sotto della scheda madre. Ecco come lo faccio... pulito e semplice e non ricordo l'ultima volta che ho avuto una scheda madre morta a causa della condensazione del socket, quindi la cosa più importante è che FUNZIONA!

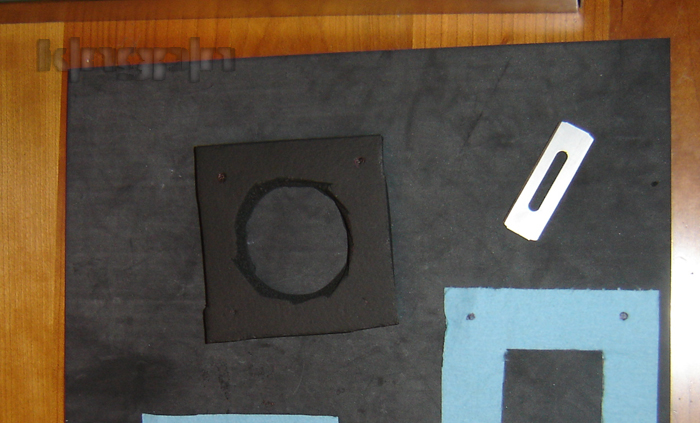
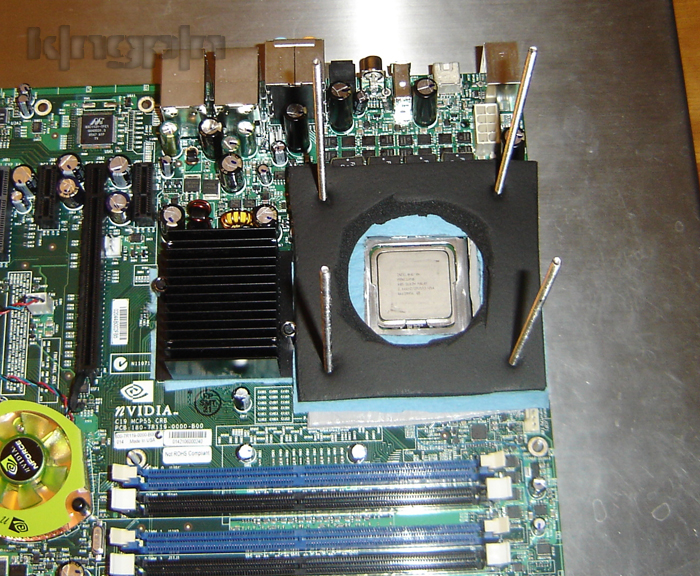
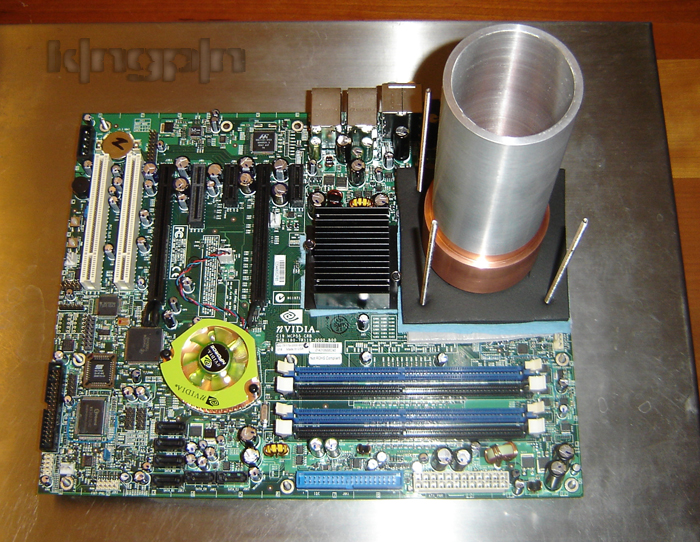
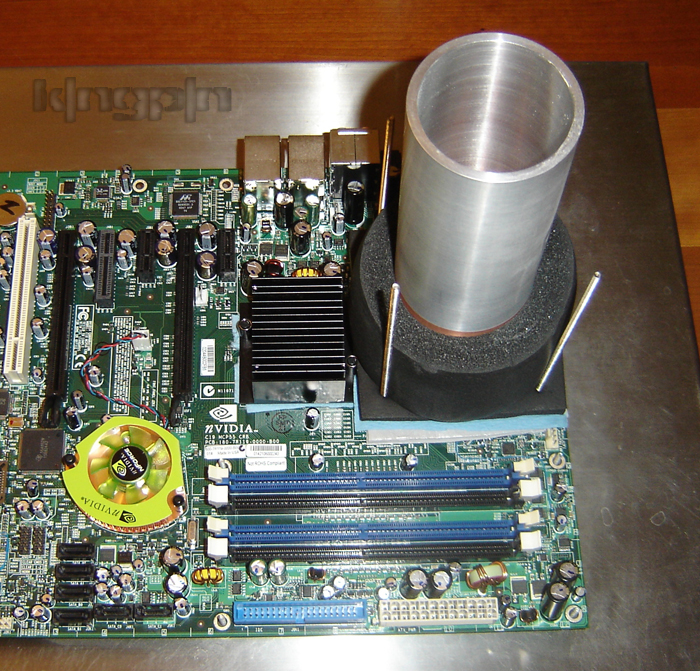
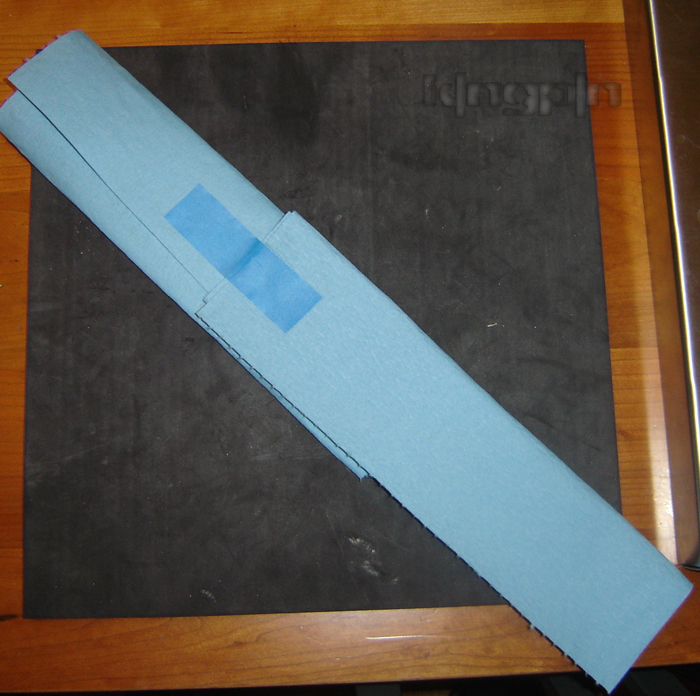
Per iniziare avrete bisogno di:

Materiale isolante avvolgi tubo con carta stagnola (Lowe's o Home Depot - marche americane, NdA), installazione rotonda di 1,3 cm - 1,9 cm del tubo, forbici e una lama affilata, smalto per le unghie, stracci o straccetti leggeri e qualche materiale termoisolante (a me piace la ceramica, la migliore).


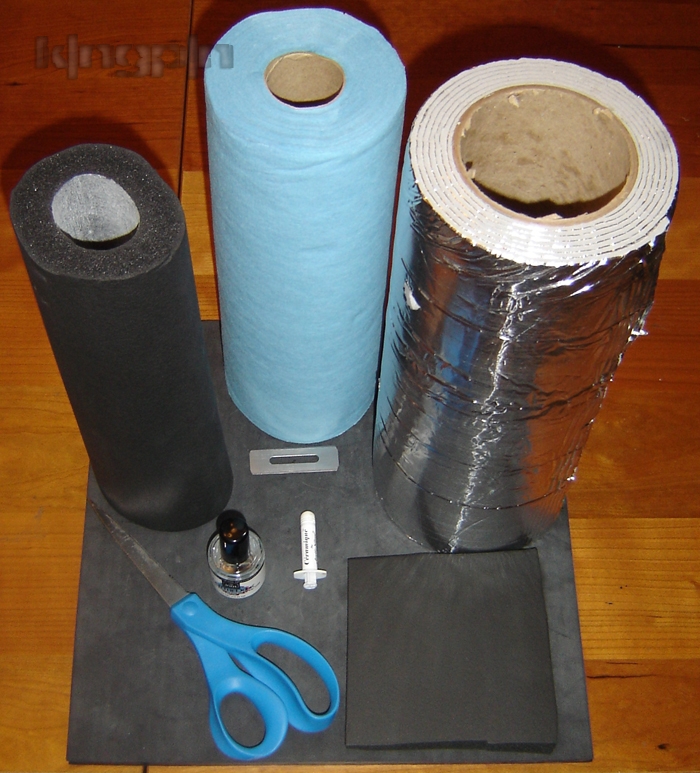
Adesso prendete la vostra scheda madre e applicate lo smalto sui componenti montati sulla superficie tutt'intorno l'area del socket, sia sopra che sotto la scheda madre. Ho segnalato il retro della foto per dare una buon'idea sulla grandezza dell'area che dev'essere considerata per questo lavoro. Ho usato una piastra madre 590sli LGA775 per questo esempio:


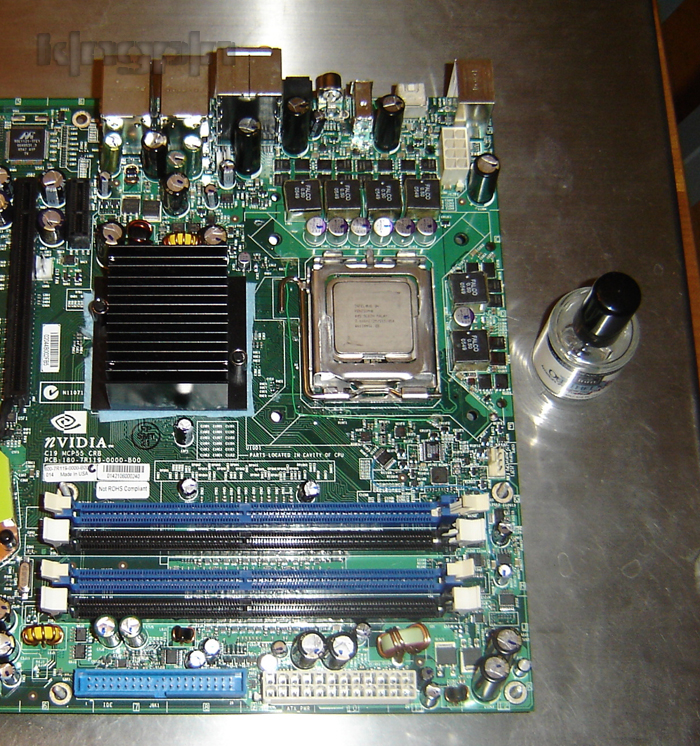
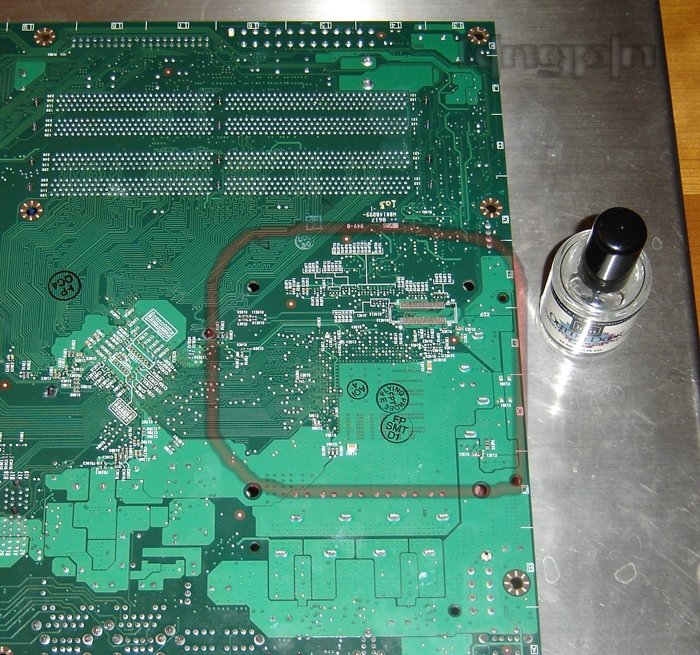
Mentre aspettate che lo smalto si asciughi, prendete la carta stagnola e tagliate 2 guarnizioni che saranno usate per sigillare l'aria che va nel socket tra le superfici dei componenti per il montaggio intorno allo zoccolo. Fate 2 identiche guarnizioni e attaccatele una sopra l'altra, quindi attaccatele giù e usate un piccolo utensile sottile per spingere la doppia guarnizione tra i mosfet, induttori e il socket come in questa seconda foto:


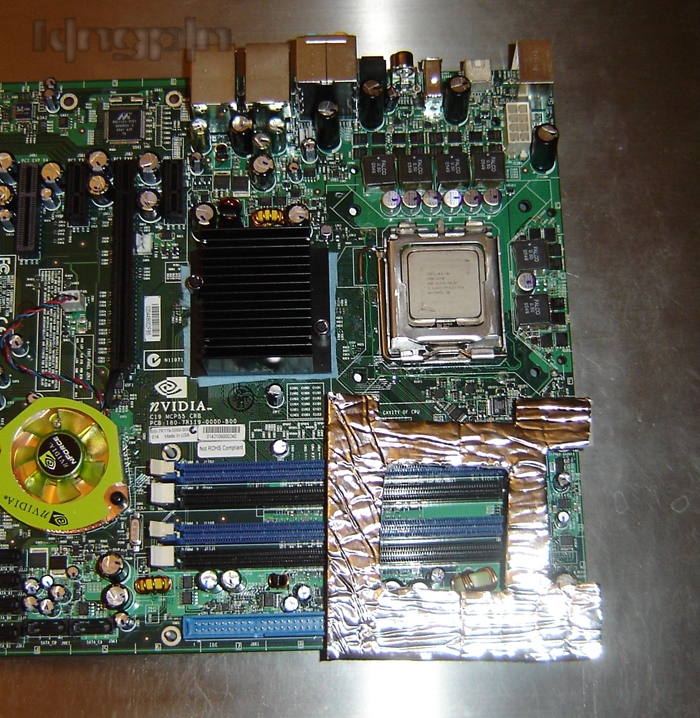
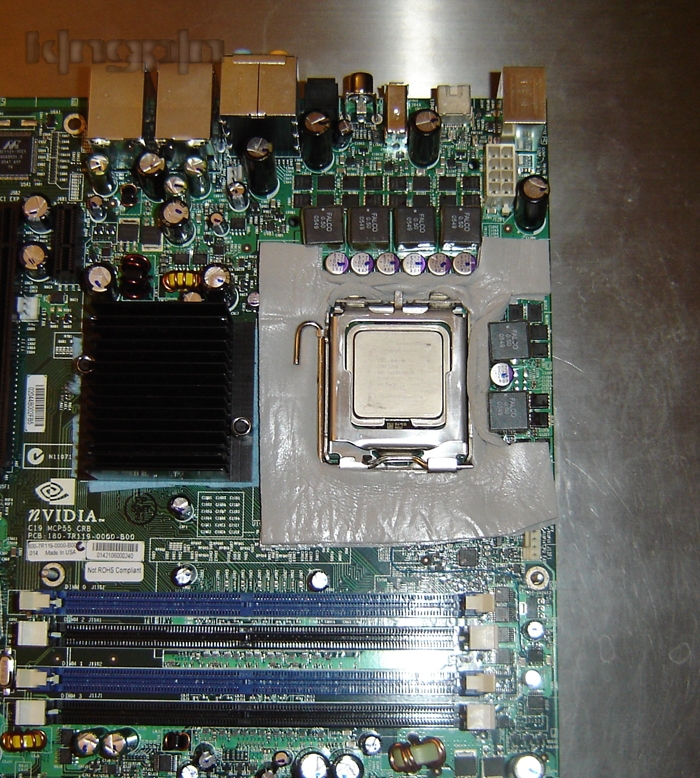
Fate lo stesso per il retro della MoBo facendo 2 pezzi attaccandoli insieme ed attaccandoli alla piastra:


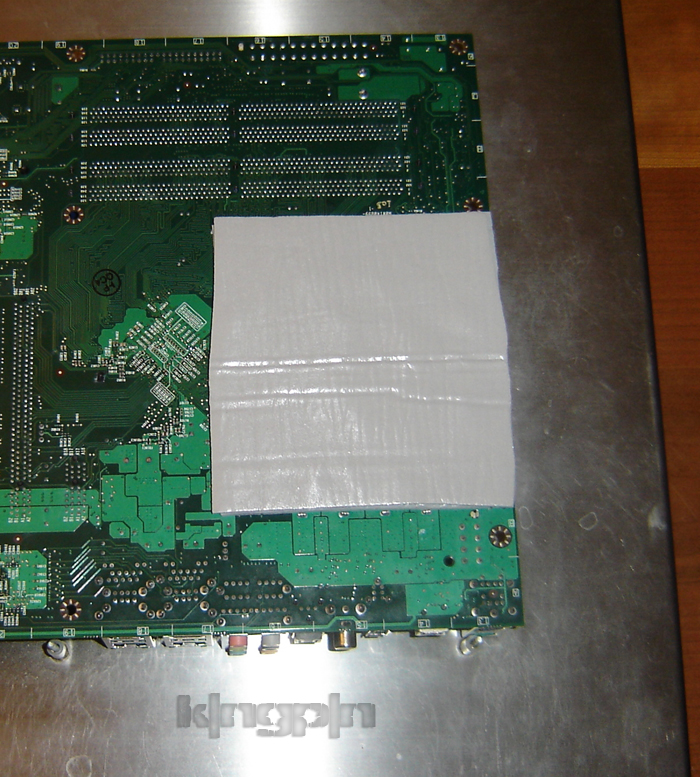
Ora a seconda di quale CPU usiate i prossimi passaggi potrebbero variare leggermente, ma sarà ancora la stessa procedura di montaggio per la maggioranza delle unità. Prendete il Backplate ed installate le barre di supporto per il contenitore così come il pezzo isolante di gomma che sigillerà l'area del retro del socket e che preverrà un corto circuito causato dalla piastra di alluminio sulla scheda madre:


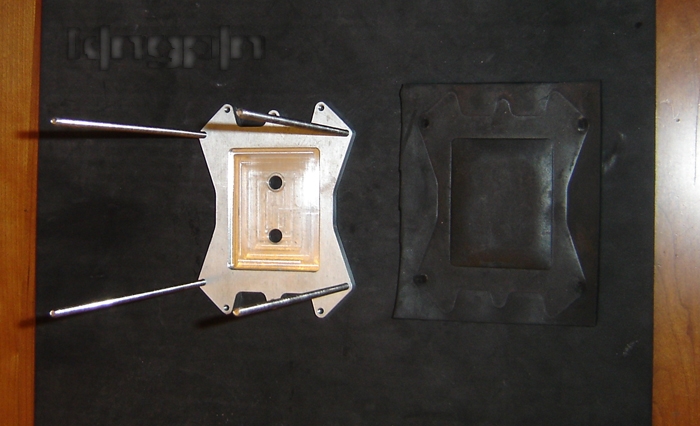
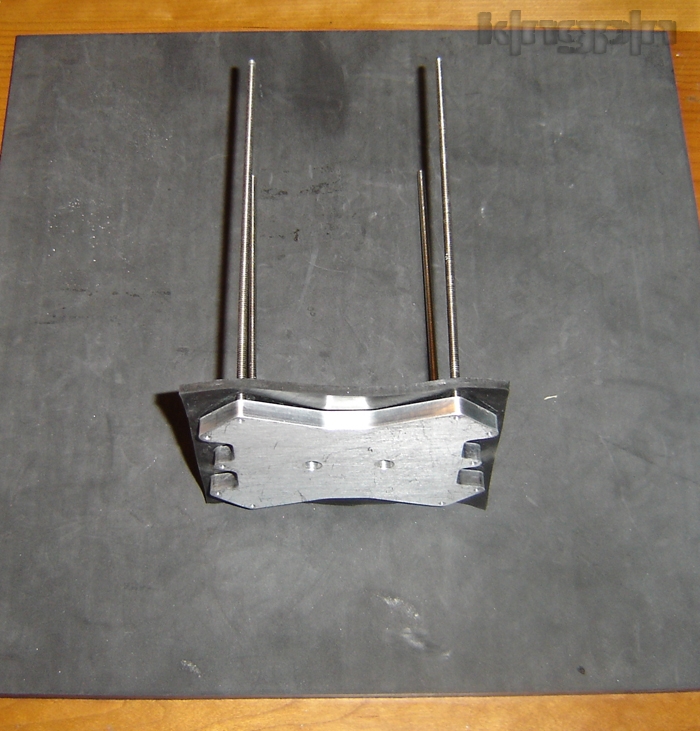
Adesso fatelo scorrere attraverso la MoBo da dietro e girate la scheda madre per completare l'installazione:


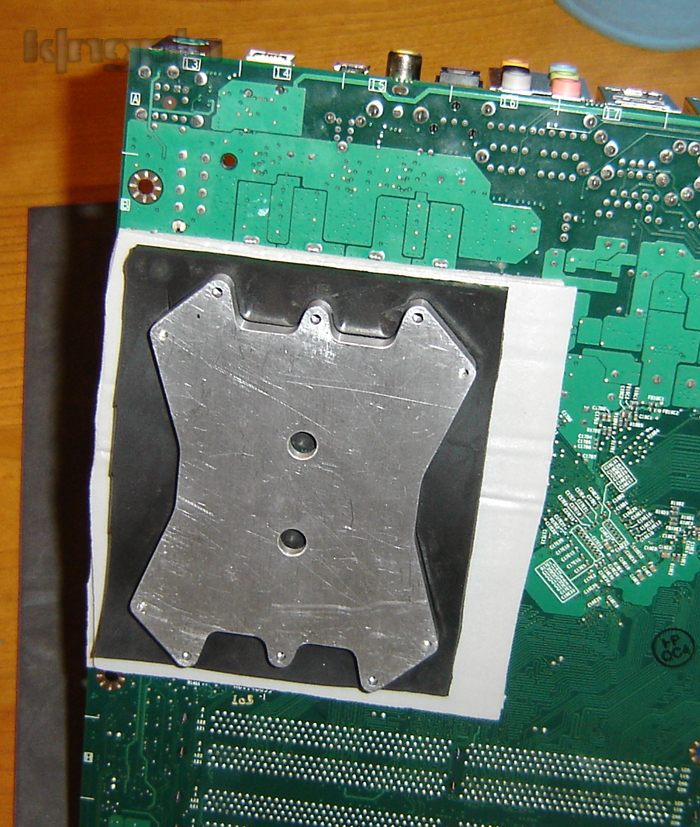
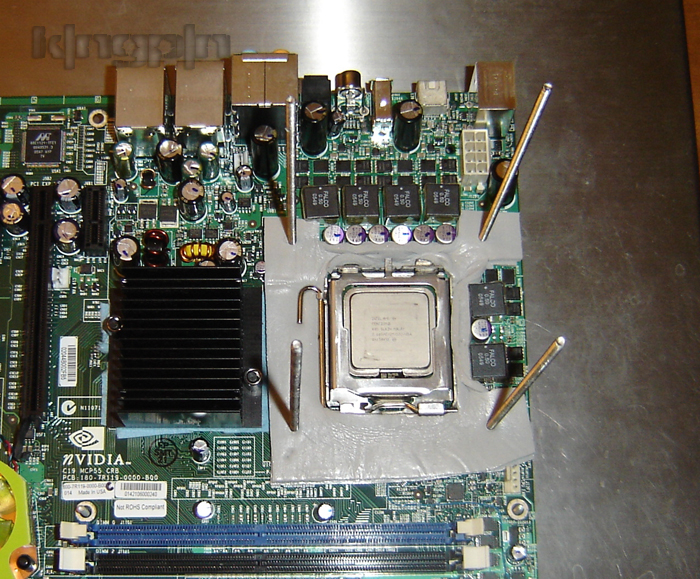
Ora faremo altre 2 guarnizioni per il socket prendendo stracci che prenderanno e assorbiranno qualsiasi goccia o umidità che si potrebbe creare attorno alla CPU se l'aria passasse da qualche spiraglio che non potete vedere. Ammucchiateli e fateli scorrere giù per le aste. Questi stracci o straccetti dovrebbero essere presenti su ogni postazione da Benchisti. Sono eccellenti per arrestare l'umidità quando si presenta. Li uso ogni volta che bencho, in vari modi:


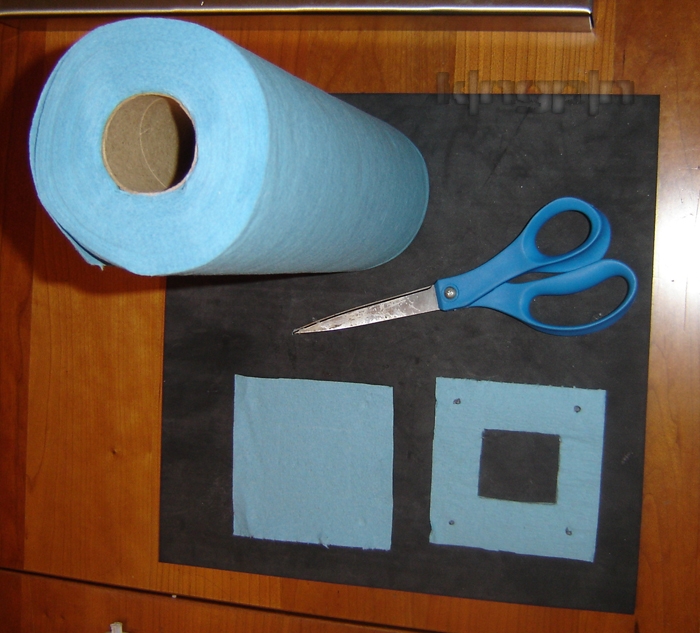
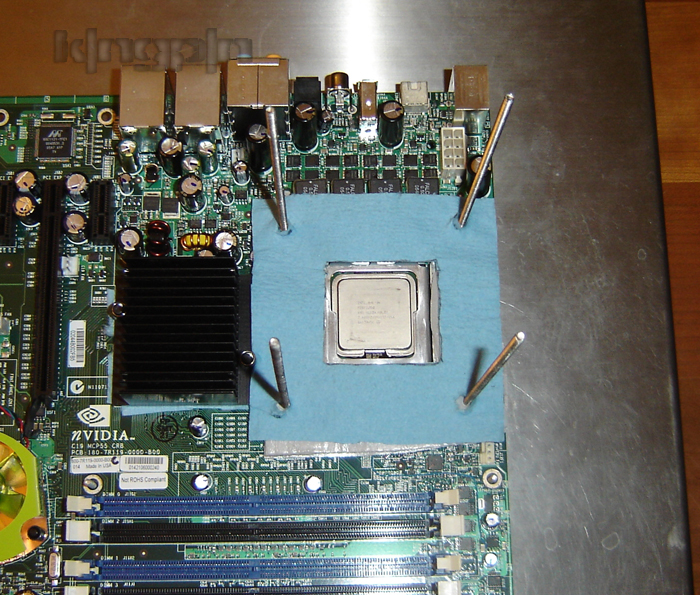
Tutti gli orari sono GMT +1. Ora sono le: 02:08.

Powered by vBulletin® Version 3.6.4
Copyright ©2000 - 2024, Jelsoft Enterprises Ltd.
Hardware Upgrade S.r.l.